|
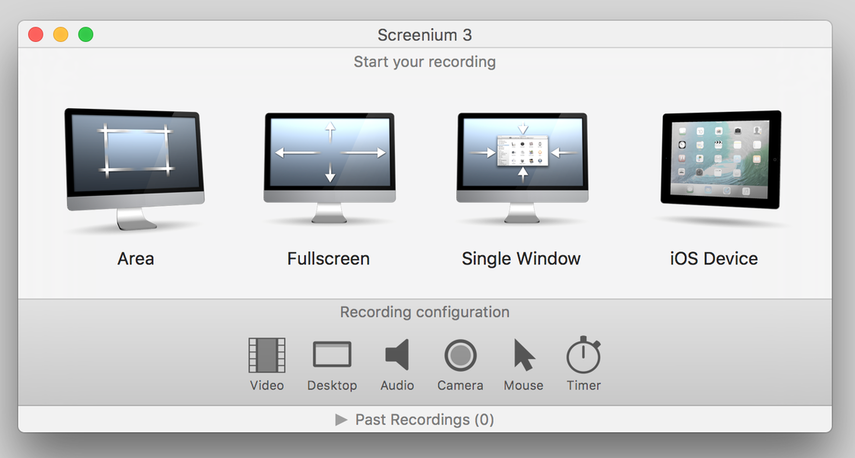
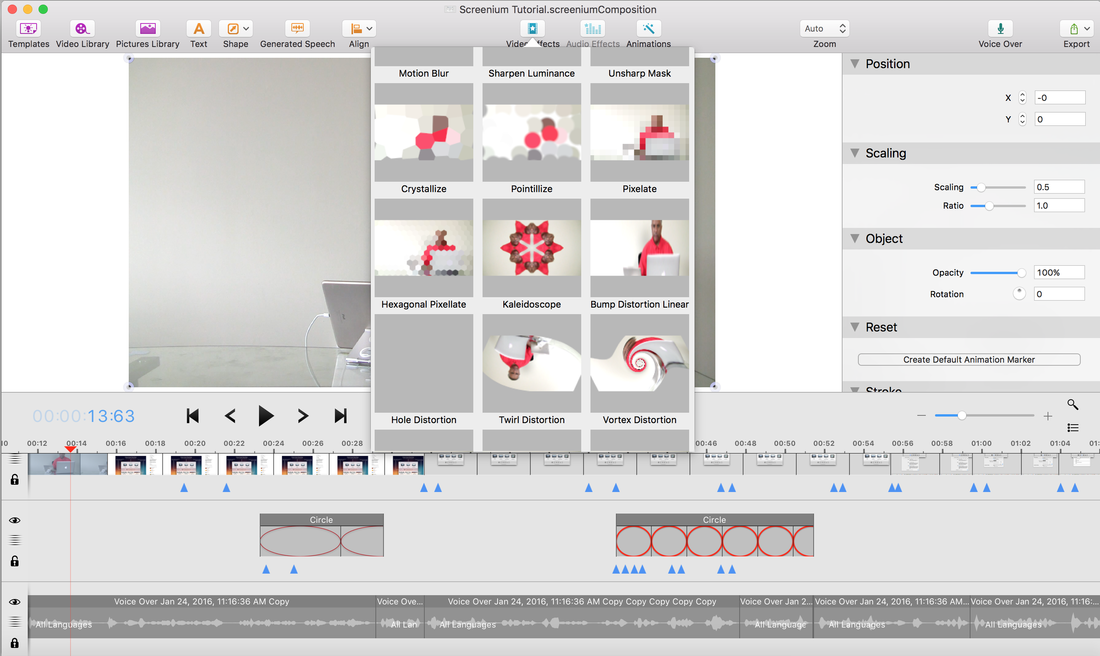
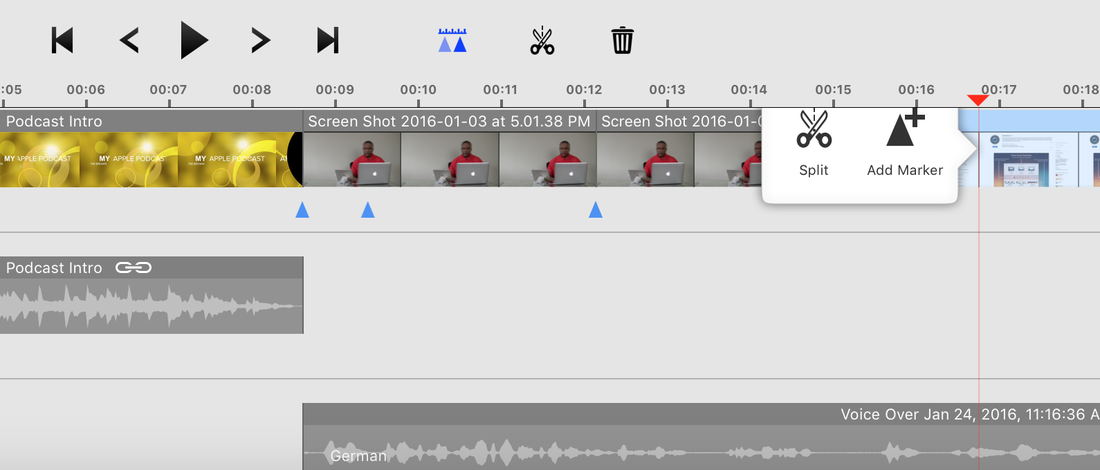
During the month of January 2016, Screenium 3 was featured as one of the best new apps in the Mac App Store. This featured profile may have to do with the new feature that was added that enables you to record your iOS screen. Nonetheless, Screenium 3 is definitely worth checking out. Screen Recording OptionsWhen you first open Screenium 3, you have four options for recording your screen: record a specific area, record fullscreen, record single window, and record your iOS device. These features are consistent with the leading apps in this category. Below this menu are the configurations for different aspects of the recording, including video (including things like frame rate), desktop (including the ability to show or hide desktop icons, audio (to specify audio source), camera (for the option to include facetime video), mouse (for cursor and mouse click visualizations), and timer. The latter is something I’m not accustomed to seeing; it provides the ability to specify your recording duration. Recording your screen is the key function of Screenium, and so the document set up is integral to starting new projects. Under file, you can set up a new document or “composition.” The composition by default is 1280 by 720. You can adjust the size by going to composition at the top menu and selecting “canvas size.” Here you can customize the size, and enlarge or reduce it proportionately. If you go with the default size and add an item that is larger (e.g. a video that is 1080p), you will be prompted to “leave as is” or “increase” the size of your composition to match the size of the size of the clip. Menu BarThe menu bar along the top provides a range of options for adding animations, and effects for audio and video. Templates are quick actions that enable you to add annotations and text. The Video Library gives you quick access to previous recordings and the Pictures tab enables you to import images from the Photos app. Screenium 3 also comes with the ability to add video and audio effects, animations, and voice overs. And one feature that is unique to Screenium is the generated speech option, which enables you to translate text into multiple languages as voice recordings, which can then be used to add multilingual narrations to your presentations. Other languages can also be added to existing audio tracks. Composite EditorBelow the menu, there are three main sections: the viewer, to the left, the inspector to the right, and the timeline below. When a clip (video, photo, or audio) is added to the timeline, the viewer and/or inspector will reveal content or controls that are specific to the media selected. Below the viewer, you will find playback controls, and just to the right options to enable animations, split clips, or to delete them. Timeline ActionsObjects in the timeline also come with added controls that provide more flexibility when setting up your animations. For example, when you move the playhead to a specific location, you can hover over your clip to add a split, add a marker, or insert a still. “Split” is equivalent to the cut tool adjacent to the playback controls; “markers” are like keyframes that mark the start and stop point of your animations, and “insert still” is equivalent to what is otherwise known as a “freeze frame.” Other FeaturesThere are some specific features that exist under the areas mentioned above that are worth highlighting separately. Under “Video Effects,” you have the option to to use the “chroma key” effect when working with green screen videos. Once selected, the chroma key controls will appear in the inspector on the right. This feature is great for podcasters who prefer more flexibility when juxtaposing the narrator with items that are being reviewed. Screenium 3 also comes with a masking tool that enables you to use any shape to mask sections of your videos or photos. Screenium 3 is a nice alternative to Screenflow and Camtasia. I encourage you to take it for a spin. Timothy Brown, Host of My Apple Podcast
0 Comments
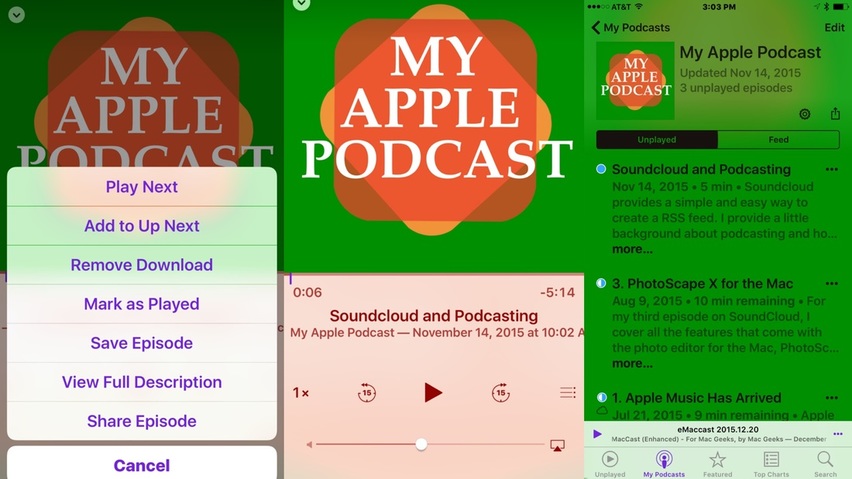
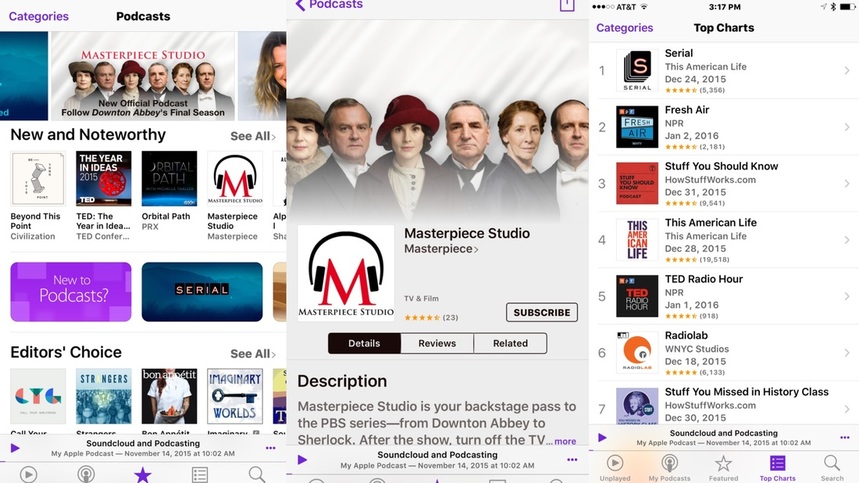
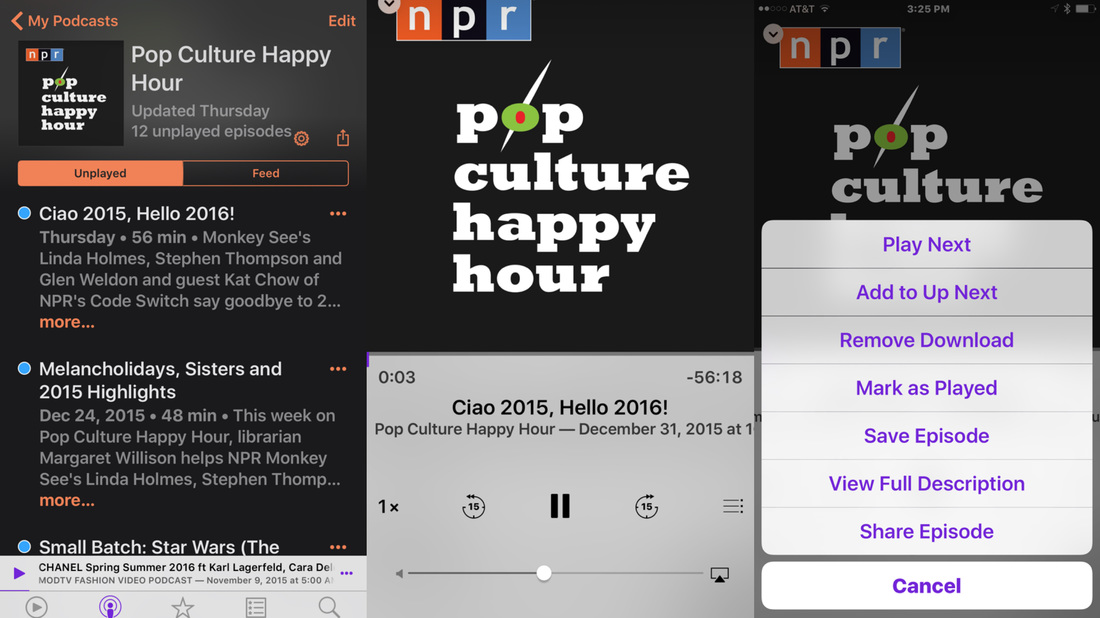
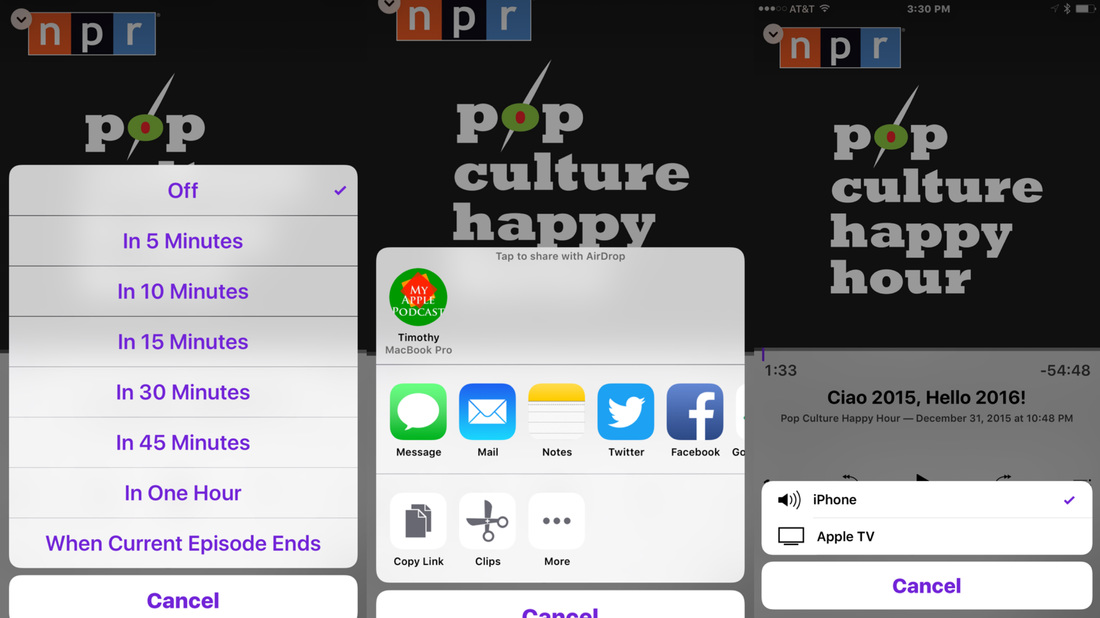
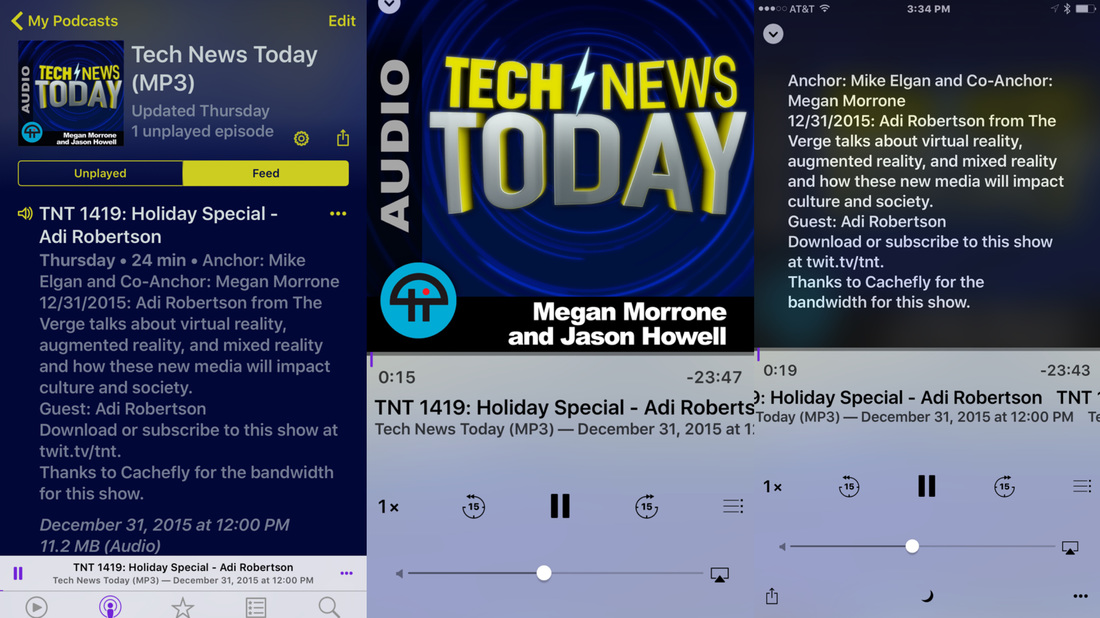
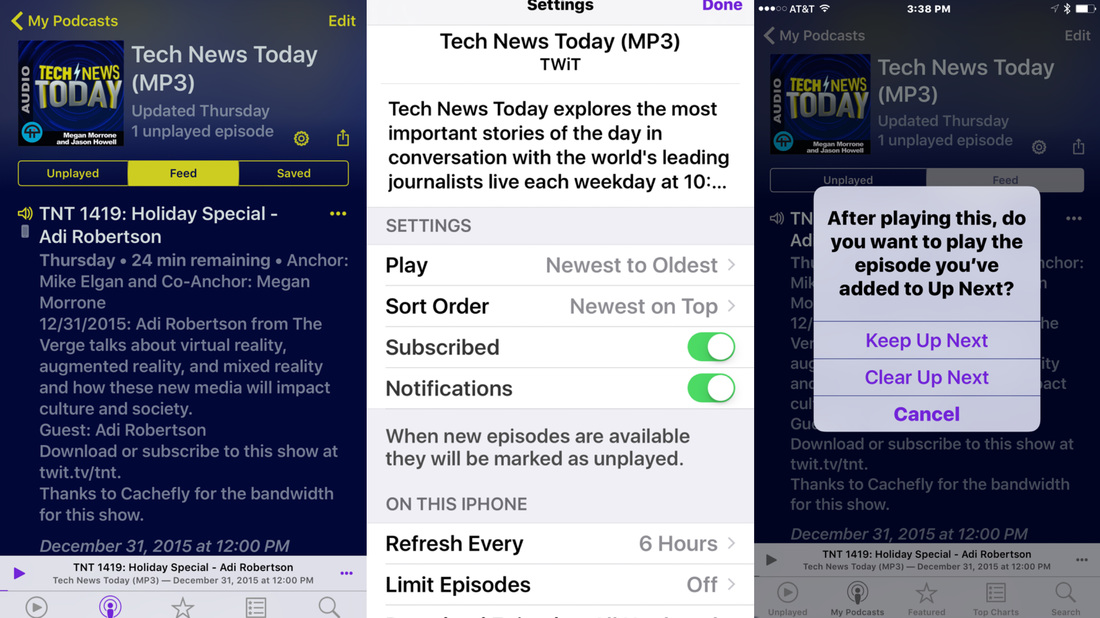
by Timothy Paul Brown, My Apple Podcast According to a variety of sources, Podcasts are experiencing a resurgence, and more people are beginning to appreciate the value of this medium. This is largely due to the success of the iPhone, which has helped to increase accessibility to podcasts. WHAT ARE PODCASTS? Podcasts are audio and video recordings attached to a web feed that people can subscribe to. Sources like iTunes function as a portal or aggregator for finding podcasts and subscribing to them. And guess what? They are FREE! FOR YEARS NOW, APPLE HAS PLAYED A KEY ROLE IN POPULARIZING PODCASTS On June 28, 2005, Apple issued a press release titled APPLE TAKES PODCASTING MAINSTREAM to announce iTunes version 4.6 and the introduction of PODCASTS which were featured alongside the music selections in iTunes. Seven years later, in June 2012, Apple introduced PODCASTS, a standalone app for the iPhone and iPad. The significance of this development was largely due to the success of the iPhone, which has been instrumental in bringing podcasts to the masses. Podcasts now comes pre-installed on iPhones, so potentially every iPhone user has access to podcasts. If you happen to be one of them, this blog post will help you understand the basic features. The Podcasts app is a purple icon with the familiar broadcasting symbol on the front. When you open the app you will find a menu of options along the bottom. Let’s start with the FEATURED tab. Here you can browse through featured podcasts by swiping across with your finger or scrolling up and down. If you want to discover the more popular podcasts, select TOP CHARTS on the bottom menu. When you find a podcast you like, tap on your selection. You will then come to a page that provides a description of the podcast, REVIEWS, and a tab for RELATED podcasts. When you find something you like, click SUBSCRIBE. If you want to find a specific podcast that is not available in the FEATURED or TOP CHARTS sections, use the SEARCH tab on the bottom menu. Your search results will appear as PODCASTS or PODCAST EPISODES. Each recording is called an EPISODE because they are typically offered as part of a sequence. On average, podcasters will update their PODCAST FEED on a daily, weekly or bi-weekly basis. MY PODCASTS If you want to locate the podcasts you have subscribed to, select the tab MY PODCASTS on the bottom menu. Here you will find a list of your subscriptions. The UNPLAYED tab on the far left will display all unplayed episodes associated with your subscriptions. When you select a podcast, you will find two tabs, one for UNPLAYED episodes and one for the FEED. The UNPLAYED tab will display the most recent episode. The FEED will list all the episodes associated with that podcast. PLAYBACK CONTROLS To play an episode, select the area that comprises the title and description. The podcast will play as an audio or video recording. If you select a video podcast, a video will begin to play at the top half of your screen, with the title and playback controls on the bottom. To the left and right of the PLAY button, you will find two buttons for fast-forwarding or rewinding the recording in 15 second intervals. The 1X to the far left can be selected to change the pace of the recording to 1/2, 1 1/2, and twice the speed level. The MENU icon on the far right will let you see what is currently playing and what is scheduled to play next. At the bottom left is the familiar SHARE icon that allows you to share the podcast as an EMAIL, TEXT MESSAGE, or to SOCIAL MEDIA. The MOON icon provides a list of options for adding a timer to your listening experience that ranges from 5 minutes to one hour. When the timer ends the podcast will stop playing. The three dots at the far right will bring up a pop-UP menu that presents the following options: PLAY NEXT, ADD TO UP NEXT, DOWNLOAD EPISODE or alternatively REMOVE DOWNLOAD, MARK AS UNPLAYED, SAVE EPISODE, VIEW FULL DESCRIPTION, AND SHARE EPISODE. And finally, continuing with playback controls is a scroll bar for controlling the volume level and adjacent to that an airplay icon for mirroring your podcast on an Apple TV. When you select an audio podcast, the audio will begin to play and you will have two options as a visual reference. The first option will be the minimized version, which will display the podcast as a banner along the bottom of the screen with the title and episode information. When you tap on the banner, the audio podcast will launch full screen, displaying the podcast artwork above and the playback controls below. Tap once on the artwork to reveal the episode description and tap again to return to the artwork. MANAGING YOUR FEEDS There are steps you can take to make your podcast listening experience more manageable and enjoyable. Let’s revisit the drop down menu that appears when the three dots are selected. The three dotted icon can be found at the bottom right when the podcast is minimized or launched full screen. It can also be found next to each podcast listing under the feed tab. PLAY NEXT lets you to select an episode from any podcast and schedule it to play immediately after the current episode. If you change your mind and select another podcast to play, you will receive a pop-up message that will give you the option to KEEP UP NEXT or CLEAR UP NEXT. The other option ADD TO UP NEXT allows you to add additional episodes to the UP NEXT LISTING. Next is DOWNLOAD EPISODE. With this option, you can download an episode for offline listening. This option does not require Wi-Fi or the use of your cellular network; the files are stored locally on your device. After you have downloaded an episode, you will also have an option to REMOVE DOWNLOAD when selecting the three-dotted icon. MARK AS UNPLAYED will display a tiny full circle in light blue just to the left of the podcast title. The circle will disappear when podcast is completed or appear as a half-moon when partially completed. SAVE EPISODE is feature that is similar to DOWNLOAD but serves a slightly different purpose. Like the download option, the file will download for offline viewing, yet this option will also add it to a special SAVED tab which will appear as a third option on the menu bar. You will also notice that a tiny iPhone icon will appear to the left of the Podcast title. You will also notice a settings icon at the top of each podcast. you will find a SETTINGS tab for sorting episodes, and changing the status for SUBSCRIBED and NOTIFICATIONS.
Under the section, ON THIS IPHONE, you can set how often you want to refresh podcasts, limit the number of episodes you want to appear in the unplayed section, download the most recent episode, or you can choose to turn on the option to delete episodes after twenty-four hours. Podcasts are streamed using an internet connection, and the use of Wi-Fi or your cellular network. If you want to manage how much data you want to use for podcasts, you can choose the option to listen to podcasts offline. And finally, under the MY PODCASTS TAB, you can select the edit button at the top right to remove podcasts by tapping on the red minus button and you can change the order of your podcasts by tapping the three horizontal bars to the right and moving your selection up and down. And that’s it for my review of Apple's Podcasts app. You can also find my review on YouTube. Try it out! You may discover a ton of resources right at your finger tips. |
Timothy Brown
Host of My Apple Podcast. Categories
All
|
 RSS Feed